- How to Correctly Load & Unload a Drill Chuck
- How to Correctly Mount / Un-Mount a Tool Fitted With a Morse Taper
It’s important to know how to safely mount a drill chuck into a tailstock. Its also just as important know how to load & unload the chuck with the required cutting tools. Fig 1 below shows a typical Jacobs chuck used extensively at TTE. The chuck is secured on the corresponding morse taper on the specific machine used whether it be a Lathe, Milling, or Drilling machine. Fig 1 shows a extension sleeve fitted.
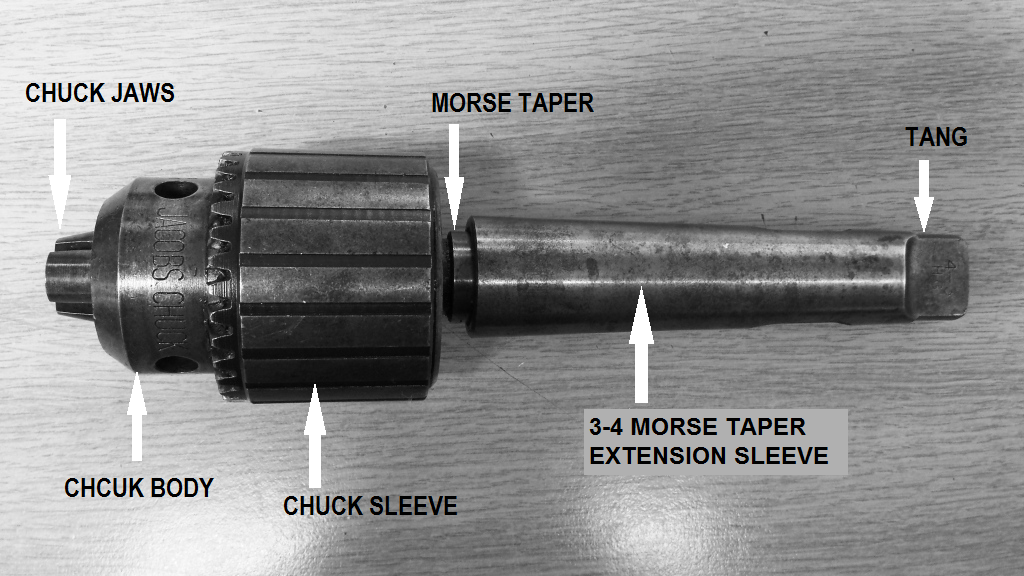 Fig1
Fig1
As mentioned the Morse taper locates and locks the drill chuck or any other tool fitted with a morse taper, for example larger Drills & Reamers usually above 12mm & Lathe centres. The drive is provided by the tang which is aligned within the mating morse taper. The size of the Morse Taper is given numerical values which correspond to British Standards see Fig2 below.
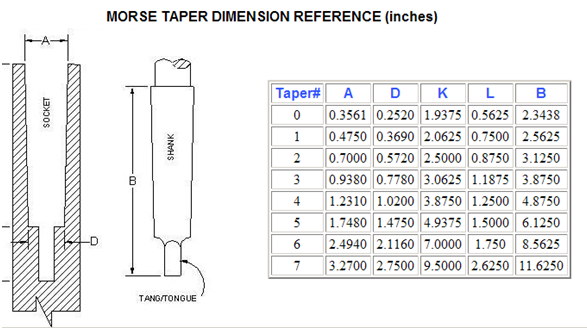 Fig2
Fig2
How do fit a drill with a No2 Morse Taper into a tailstock which a No4 ? Well easy – you can use a 2-4 step up sleeve and in some cases there may be a requirement to use a step down sleeve. See Fig3 below.
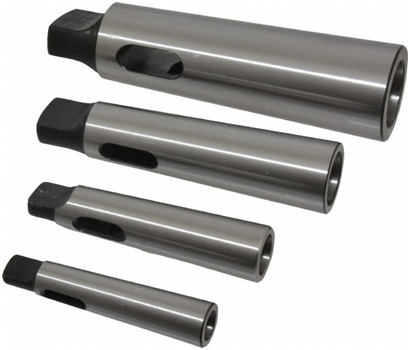
Fig3
Key learning point – To ensure the tapers are concentric to each other. Always ensure that both tapers are clean and free from any debris or damage.
Safety Advice (GOOD SKILLS)- When mounting the taper always ensure the tang is aligned on the horizontal plane so it locates positively within the mating slot. If mounting in the Tailstock ensure that the spindle is extended beyond Zero on the scale. Otherwise the ejector may not be fully retracted and potentially eject the chuck / drill out of the taper which could cause injury. See fig4 below for the correct method of mounting. As you can see the spindle is extended beyond zero, the tang is aligned , there is no tool e.g drill bit mounted. Its also with noting how the operator is holding the chuck to avoid any pinch points. Also evident is that there is no drill bit fitted why ? As there is potential collision hazard (LINE OF FIRE) for the operator. Furthermore the drill bit should never be loaded into the chuck unless the chuck is securely mounted first.
 Fig4 – (Editors Note – In Fig4 above the operators little finger is beyond the body of the chuck this is okay as the chuck shown is much bigger than the tailstock sleeve always ensure that fingers are clear when fitting the chuck into the taper)
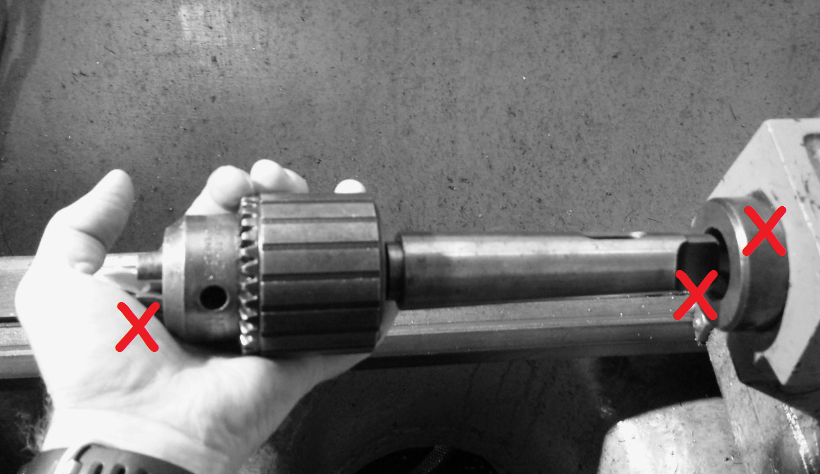 Fig5
Fig5
Fig5 shows how NOT to mount the chuck WHY?
1, The bit has already been loaded and could puncture the operators hand if bounce back occurs NOTE – This has happened at TTE!
2, The Tang is not aligned – therefore the taper will not locate and bounce back will occur.
3, The Tailstock spindle has been retracted thus the ejector will be extended therefore the taper will not locate and bounce back.
Loading the chuck safe procedure – Fig6 shows the key in the correct position to tighten the chuck, note the position of the key relative to the chuck, the thumb grip on the tommy bar is around the 10 o’clock position. It should be noted fig6 is for demonstration only as the bit should never be loaded unless the chuck is mounted.
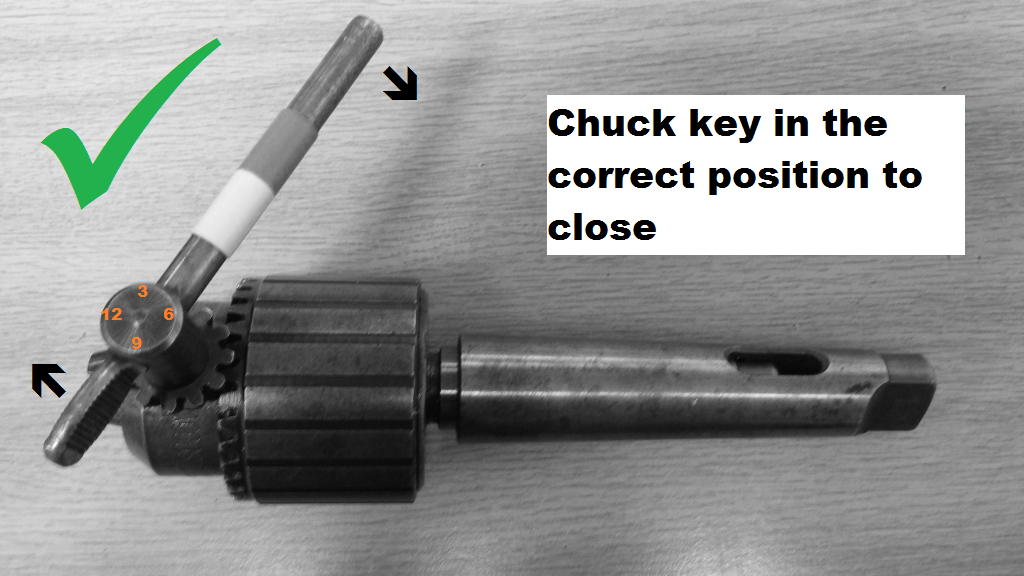 Fig6
Fig6
Loading the drill bit – Rotate the chuck sleeve by hand to open and close. Open just over the diameter of the bit being loaded, then hand tighten as shown below in fig7.
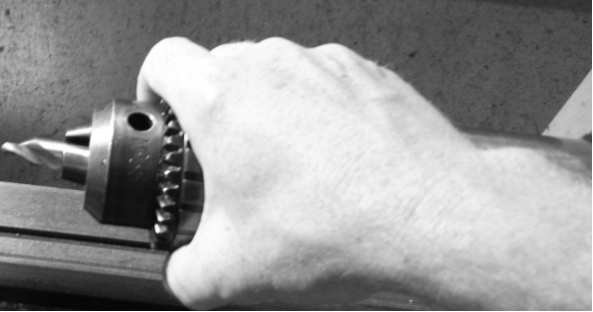 Fig7
Fig7
Use the chuck key as described in fig6 as demonstrated by the operator below in fig8. Note how the hand remains behind the drill bit avoiding any potential contact with the cutting edge.
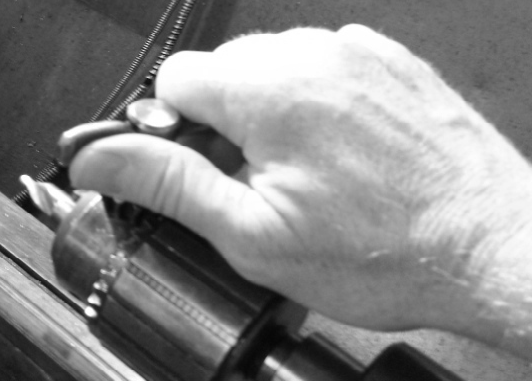
Fig8
Unloading the chuck safe procedure – Fig9 shows the key in the correct position to open the chuck, note the position of the key relative to the chuck, the thumb grip on the tommy bar is around the 2 o’clock position. It should be noted fig9 is for demonstration only as the bit should never be unloaded unless the chuck is mounted.
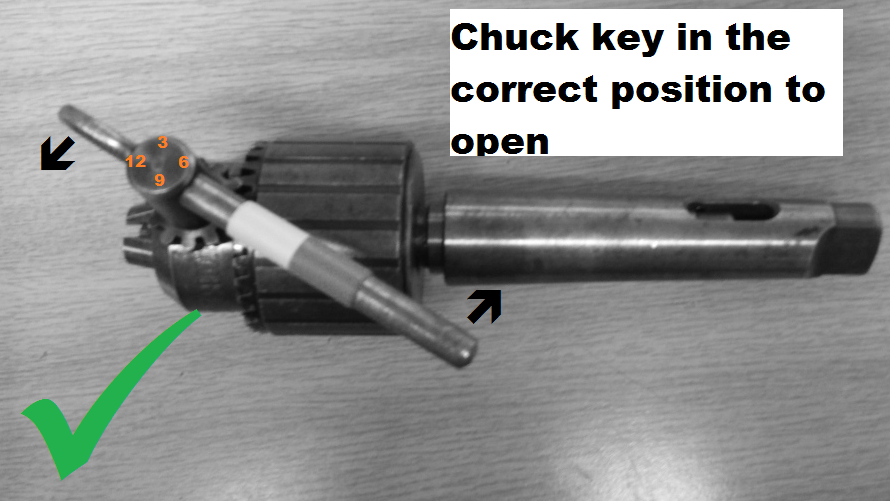 Fig9
Fig9
Use the chuck key as described in fig9 as demonstrated by the operator below in fig10. Again note how the hand remains behind the drill bit avoiding any potential contact with the cutting edge.
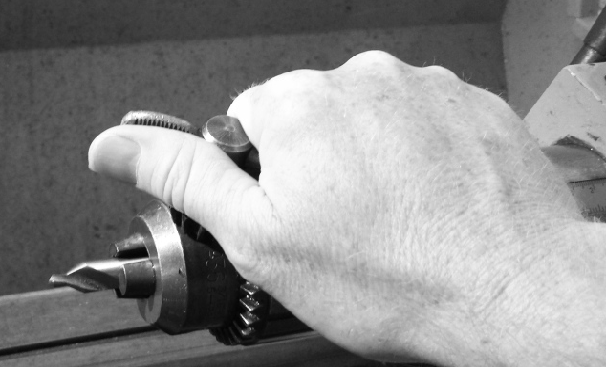 Fig10
Fig10
Key learning points-
- Always ensure the chuck is mounted before loading/unloading drill bits.
- Always use the correct size chuck key for the chuck.
- Check the teeth on the chuck and key for any wear or damage.
- Check that both tapers are clean and free from any damage.
- When mounting the chuck in a tailstock or sleeve ensure the ejector is fully retracted (advance the spindle past zero on the scale).
- Ensure the tang aligns to the mating slot (keep it on the horizontal plane).
- When removing a drill sleeve with a hammer and drift never rest the body (Taper) as it may damage the taper always rest on the tang.
Using a Drift
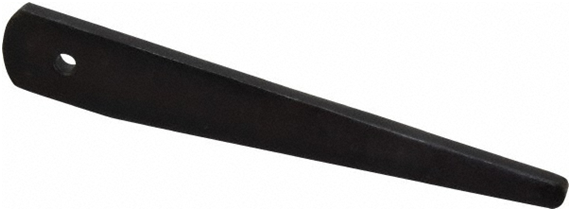
Fig11 Above showing a standard Drift.
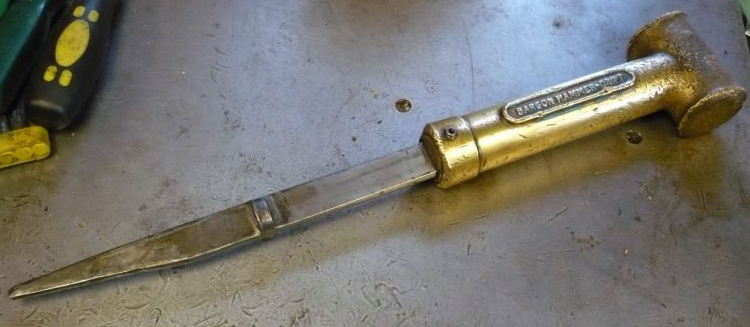 Fig12 Above showing a spring loaded hammer Drift.
The procedure below is specific to using a drilling machine see fig13.
- Turn the chuck of the drill press with your hands until you see the slot of the spindle arm align with the quill slot located on the drill press.
- Insert the drift key into the quill slot with the tapered side of the drift key facing toward the chuck of the drill press
- Tap on the back of the drift key with the hammer to drive the drift key into the spindle slot.
- Hold the chuck with one hand and hit the back of the drift key hard to free the spindle from the drill press. This may require a few hits.
- Lower the hand holding the chuck to allow the spindle to fall free from the drill press.
-
Pull the drift key from the quill slot and make sure you don’t lose it. The drift key is shaped to fit your specific drill press.
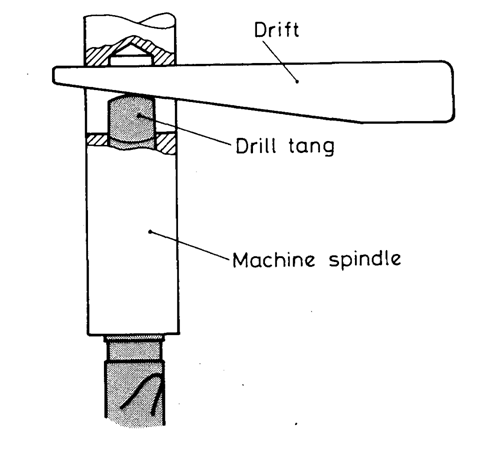
Fig 13
Remember Good Skills = Good Safety
You can view can download the presentation here ![]()